Vset3D Studio offers a true 3D virtual environment where you can greatly enhance the production value of your project. Our powerful and versatile software allows you to use a wide range of lighting effects and camera controls within every virtual studio offering. All you need is a few yards of green material as a backdrop, a good light source, and a camera to record or stream your video footage.
Once you have the footage on the computer running Vset3D Studio, you can adjust the video keying to remove any of the green from the shot leaving only you or your subject placed in the virtual studio. We provide amazing and professional results at a fraction of the cost to create a similar production in the real world. Best of all, we can do this real time!
Use our software for your live production.
Our software allows you to set several different positions for your virtual camera. These positions can be changed giving the appearance that you have a several camera shoot. The amazing thing about this is that it only requires one camera to get these results.
To use Vset3D’s ray tracing and DLSS options, you must use an NVidia RTX graphics card. Vset3D can be run on an AMD card, but ray tracing and DLSS will not be available.
About Vset3D Studio
Vset3D is a DirectX 64 Bits software built for Microsoft Windows 10 or 11.
Vset3D can also be started with command line arguments:
-monitor N Run Vset3D on specified monitor; N = monitor number
-screen-height Set the screen height resolution
-screen-width Set the screen width resolution
-force-d3d11 Start Vset3D Studio in DirectX11
-force-d3d12 Start Vset3D Studio in DirectX12
-window-mode Force Vset3D in resizable windows mode
-screen-fullscreen Force Vset3D in full screen
This starts Vset3D in DirectX11 >> STUDIO.exe -force-d3d11
Ray tracing and DLSS are only available in DirectX 12 mode.
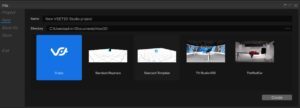
Quick Start
Loading a template :
Select Virtual Sets
Select the template
Press Add or double click on it
Load Project :
Open file window
Select New
Select your project
Select Create
Add Output :
Create or select one camera
Add mixer
Add Output +
Open Mixer window to start switching
Camera Switching
Once you have set all cameras, live inputs and animations you are able to control them from the Control Panel window.
How to work with the Control Panel
There are three ways to use the control panel.
The Mouse
The Keyboard
Network / Stream Deck / companion …
Mouse Camera switching:
Click with your mouse on the button corresponding to the camera you wish to switch
Click Mixer Cut or Mixer Move to start switching or movement
The transition speed can be set with the Monitor Duration value (1 = one second)
Keyboard Camera switching:
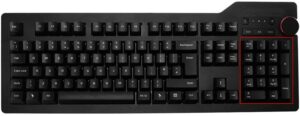
Make sure you have a number pad on your keyboard.
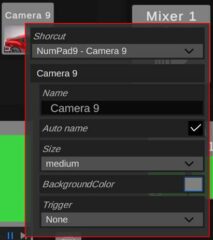
When you create cameras or inputs, Vset3D Studio automatically adds the corresponding button
with its shortcut in the Control Panel
You can use Right click to modify settings of any button
Shortcut: Define the Keyboard key which preselects the camera
Name: Use it to rename the button
Auto name: Let Vset3D naming the button
Size: Button size in the Control Panel
Background Color: Set the button color
Trigger: launches the selected animation at the same time that the switching
To switch camera with your keyboard:
Make sure all Control panel shortcuts are correctly assigned.
Press the number corresponding to the desired camera on the numeric keypad of your keyboard.
Release
Press Enter on the num pad to start the switching
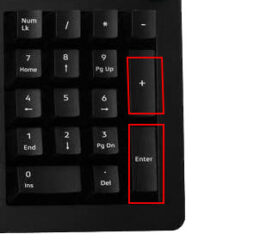
Vset3D allows you to have movement between camera positions.
To start movement:
Press the number corresponding to the desired camera on the numeric keypad of your keyboard.
Release
Press + on the num pad to start the movement or Enter to cut
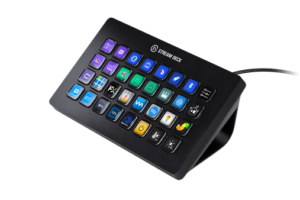
Stream Deck and companion
Stream DeckCompanion
VSet3D Studio can work with Companion and Stream deck or any other device/software able of sending commands over a TCP-IP network.
You can send commands to Vset3D Studio through tcp-udp on Port 7000. Command end character is n
To select Camera 1 on Mixer 1, use: setpreview: 0 virtualcamera 0 \n
To do a 5 seconds smooth transition to Camera 1on Mixer 1, use: dotransition: 0 fade 5 \n
To do Cut transition to Camera 1 on Mixer 1, use: dotransition: 0 cut \n
To start Media Player 1, use: mediaplayer: 0 play \n
To start Animation, 1use: animation: 0 play \n
Vset3D Studio User Interface
The user interface of Vset3D Studio is divided into 3 sections. The top section which shows all the tools icons, the middle section which is the 3D editor view, the bottom section which is the statue section.
General Tools Icons
1 2 3 4 5 6 7 8 9 10
File: Allows you to load and save project
Sources: Allows you to add live video inputs, NDI, images, media players, to your project
Scene: Allows you to navigate and select item in your project
Inspector: Gives you access to the setting of the selected item
Animation: Allows you to add animation to the selected item
Rendering: Allows you to add and manage rendering option
Mixer: Allows you to add live outputs to your project
Camera Remote Control: Open Camera Remote window
Control Panel: Open Vset3D Control Panel
Open Mixer1 monitor
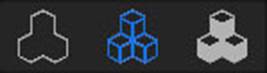
Creation Tools Icons
1 2 3 4 5
Add Virtual Camera: Allows you to create virtual camera
Add Camera Facing Plane: Allows you to add plane dedicated to green screen video
Add Item from library: Allows you to add standard light or fixture, 3D object, primitive
Add Imported Mesh: Allows you to import single FBX object or full virtual set
Add Group: Allows you to add dummy objet usefull to group objects in the project
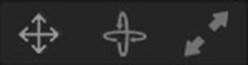
Transform tools Icons
1 2 3
Move: Allows you to move selected object
Rotate: Allows you to rotate selected object
Scale: Allows you to rescale selected object
Editor Quality settings Icons
1 2 3
Editor OFF: Allows you to turn off 3D editor view to save 3D resources when you are in live.
Editor quality Draft: Allows you to disable all rendering option available in the Rendering menu
Editor Quality Full: Allows you to apply all rendering option from the Rendering menu
Editor View Selection
Front
Back
Left
Right
Top
Bottom
Isometric
Perspective
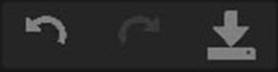
Actions Icons
1 2 3
Undo
Redo
Save Project
Layout menu
Allows you to save and manage Vset3D Studio windows position
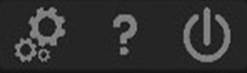
Settings Icons
1 2 3
Settings: Open project settings window
Open Help window
Open Exit menu
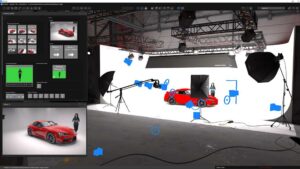
3D Editor View
The user interface of Vset3D Studio is divided into 3 sections. The middle section is the 3D editor view.
In this view you will :
Add Vset3D library
Import FBX
Create animations
Add and adjust light settings and positions
Add and adjust cameras positions and settings
Scale and move objects
Orient and zoom Editor view
In the editor view you can use Tab to show/hide all opened windows and Escape to reset selected window.
Quality setting icons
Use the first quality setting icon to stop the editor when you are in live, it will save a lot of GPU Resources.
Use the control panel to switch your cameras. The Mixer monitor can be used as program monitor.
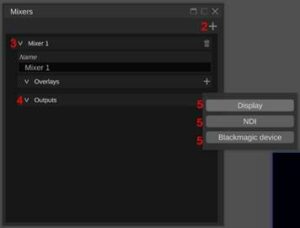
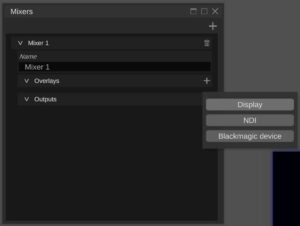
If you have a dual monitor you can assign the mixer output on the 2nd monitor by selecting Display.
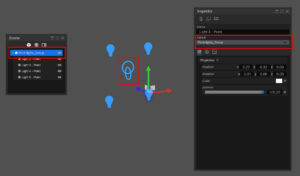
Light Gizmos
Area light
Omnidirectional Light
Direct Light ( Sun )
Spot Light
Camera Gizmos
Camera Gizmo
Focus target gizmo. Allows you to adjust camera’s Depth of field focus distance.
Camera target gizmo in Locked to target mode enabled.
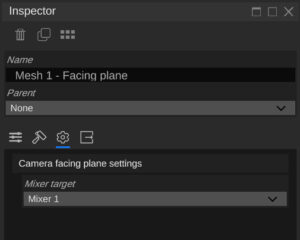
Camera Facing Plane
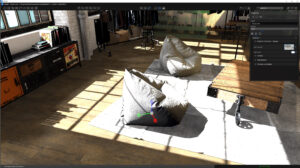
This object is dedicated to green screen video. Use it to display your talent and do Chroma key.
This object is always oriented towards the selected Mixer
Group
Group is an invisible object that allows you to parent Lights or objects
Point Lights Group holds 4 spotlights. Example below :
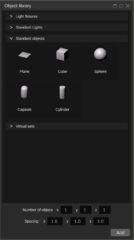
Primitive Meshes
Vset3D comes with build in primitive objects
Plane
Cube
Sphere Cylinder
Capsule
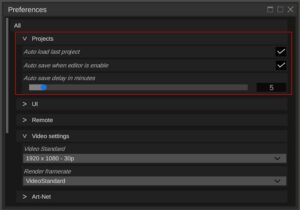
Auto load auto Backup
This Option allows you to manage the Auto load and Auto save options
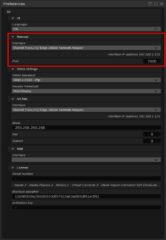
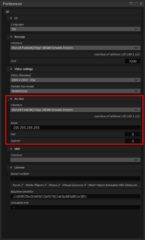
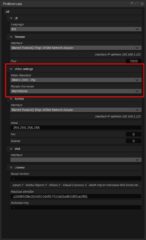
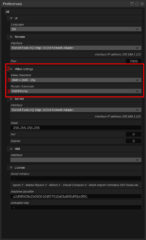
Remote
This option allows you to set network interface used to control Vset3D through IP command
Video Settings
This option allows you to set the project video resolution and frame rate synchronization method.
Always set frame rate and project frame rate to the same value, otherwise you will face dropped frames
Art-Net
This option allows you to adjust the network device setting used by DMX fixtures.
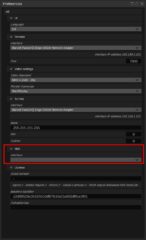
Midi
This option allows you to select a MIDI device.
File
This window allows you to create, load and save your projects.
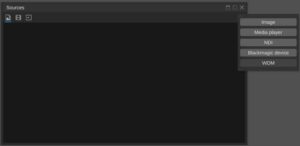
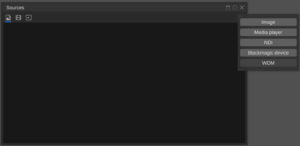
Sources
This window allows you to add sources to your project.
Source can be a live video input, NDI stream, video media, png or jpg image.
Vset3D Studio natively supports Blackmagic Decklink devices.
WDM devices are also supported.
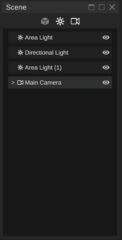
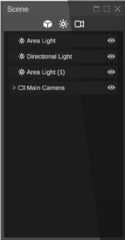
Scene
This window allows you to select or show/hide objects from the scene.
You can use the Object, Light, and Camera icons to filter displayed items.
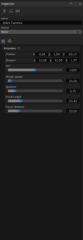
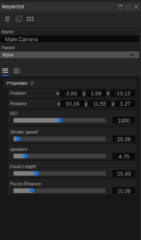
Inspector
The inspector gives you access to all the parameters and settings of the selected item.
Displayed property depends of the selected item.
Animation
This window allows you to add animation to selected item.
Displayed Property depends of the selected item
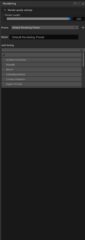
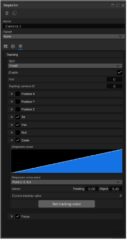
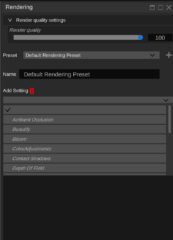
Rendering
This window allows you to control rendering quality and rendering settings options.
The Render Quality slider adjust DLSS value and is only available on RTX NVidia graphic cards.
RTX 20xx
RTX 30xx
RTX 40xx
Add settings allows you to add rendering options.
Today’s Available Rendering options:
Ambient Occlusion
Beauty
Bloom
Color adjustments
Contact shadows
Depth of field
Exposure
Fog
HDRI Sky
Indirect Lighting Controller
Light Cluster
Screen Space Global illumination
Screen Space Reflection
Split Toning
Tone mapping
Vignette
Visual Environment
Recursive Rendering (experimental)
Mixer
This window allows you to add video outputs to your project.
Outputs can be another monitor, an NDI stream or a Blackmagic Decklink card.
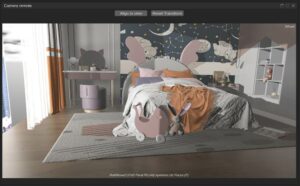
Camera remote
This window shows you the view of the selected camera and allows you to control this camera with your mouse.
Align to view: set orientation of selected camera same as editor.
Reset Transform: resets the camera position and orientation.
Available mouse controls in this window:
Wheel = Field of view
Middle Click = Pan
Alt + Middle Click = Pan/Tilt
Ctrl + Middle Click = Roll
Maj + Wheel = Move forward/backward
A + Wheel = Aperture
F + Wheel = Focus (Add Depth of Field in the render option to enable it)
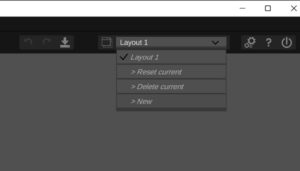
Layout
This tool allows you to save Vset3D window position.
Use New to create a new layout slot.
Use Reset Current to clear the active layout.
Use Delete Current to delete active layout.
Use key Tab to show/hide all windows
Use key Esc to reset selected window.
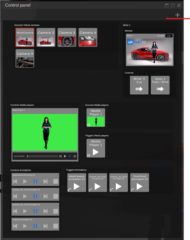
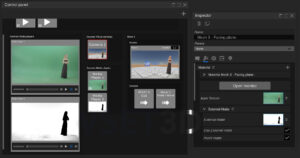
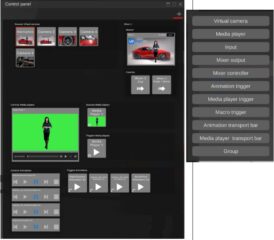
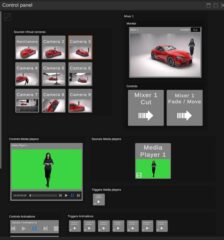
Control Panel
This tool allows you to switch cameras, control animations and media players.
This is a dynamic window. All buttons are automatically created by Vset3D Studio when you add Camera, Media, Animation and Mixer.
Each button has a keyboard shortcut that can be customized (Use right-click to bring up a button’s configuration menu).
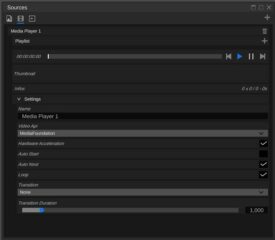
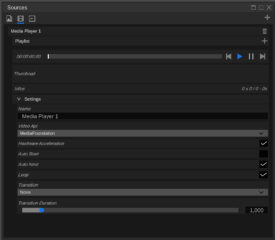
Sources Media player
This window allows you to add media players. Each player can handle several videos in a playlist
Chroma Keyer
This window allows you to adjust keyer parameters of the selected Facing plane object.
.
External Matte
Using an external Keyer with Vset3D streamlines your virtual set production workflow.
Unity 3D Addressables/Librairy
Vset3D is based on the Unity 3D game engine, which allows you to use Unity’s addressable files and create your 3D Set in Unity 3D, then import them into Vset3D Studio as library.
The addressable Library creation documentation comes with the Expert license.
Media File Format
PNG/JPG
H264/MPEG/MOV/AVI/
FBX
DMX Fixtures and Lights
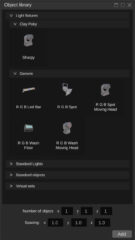
Vset3D comes with fixtures that can be added to your project. They can be animated with the Vset3D animation tool or controlled via DMX device or software.
Generic
RGB Led Bar
RGB Spot (PAR 64)
RGB Spot Moving Head
RGB Wash
RGB Wash Moving Head
Clay Paky
Sharpy
System
Aera light
Directional Light
Point Light
Spot Light
NDI
Vset3D supports Ndi technology from Newtek. Don’t forget to install Newtek NDI Runtime and NDI Tools.
WDM Devices
WDM = Windows Driver Mode
Vset3D Studio supports WDM compliant USB video capture device.
BlackMagic Design
Vset3D studio natively supports Blackmagic Decklink devices.
Compatible Video Capture Cards (Tested):
DeckLink Mini Monitor
DeckLink Mini Recorder
DeckLink Mini Monitor 4K
DeckLink Mini Recorder 4K
DeckLink Duo 2
DeckLink 8K Pro
DeckLink Quad HDMI Recorder
DeckLink Quad 2
Materials
Standard • Use it on opaque object (default material) Double Sided • Use it to have both sides of the object visible Transparent • Use it to on basic semitransparent object. Transparent Cutout • Use it on transparent object Transparent Refraction • Use it to on refractive semitransparent object. (ex: glasses) Unlit • Use it on an object that will not be affected by ambient light conditions Unlit Transparent Cutout • Use it on an object that will be transparent and not affected by ambient light conditions Water River / Water Lake • Specialized materials dedicated to dynamic water simulation
Video Format
Video format can be set from the Setting window.
Carefully select the resolution and frame rate as they have a direct impact on VSet3D’s performances.
High frame rate and high resolution means high GPU load and can lead to dropped frames.
DLSS/ Render Quality Settings
Render Quality Settings. This slider adjusts the DLSS level.
DLSS is upsampling technology based on Deep learning and AI. DLSS allows you to reduce the GPU load on 4K projects.
You need compatible NVidia GeForce RTX 20xx, RTX 30xx, RTX 30xx graphics card to use DLSS.
Rendering Settings
Ambient Occlusion Adds a shadow to the contact area between objects and in the corners of the decor. Beautify Adds sharpness parameter to the render engine Bloom Adds glow on Highlight image parts Color Adjustments Adds color & contrast parameter to the render engine Contact Shadows Enhances shadow quality at the surface contact (works only with Directional light) Depth Of Field Adds camera depth of field control to the render engine Exposure Overrides camera exposure Fog Adds fog fx to the render engine (must be added to use volumetric lights) Gradient sky Adds 3 color gradients sky to the render (needs Visual environment) HDRI Sky Allows you to use HDRI image as Sky (needs Visual environment) Indirect Lighting Control Adds intensity control on Global illumination and reflection Screen Space Global illumination Adds indirect lighting support to the render (supports real-time ray tracing on NVIDIA graphic cards) Screen Space Reflection Adds refection support to the render (supports real-time ray tracing on NVIDIA graphic cards) Screen Space Refraction Adds refraction support to the render (supports real-time ray tracing on NVIDIA graphic cards) Tone Mapping Adds overall image lighting curve control to the render engine Vignette Reduces peripheral image brightness Visual Environment Adds Sky to the render engine
FreeD camera tracking
The Vset3D Studio Expert license is FreeD compatible.
This technology makes it possible to carry out augmented reality projects or projects requiring 3D tracking with 3D tracking data from FreeD compatible PTZ cameras.
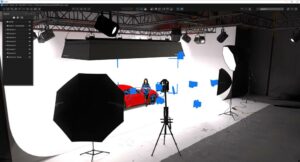
Vset3D Studio is virtual set software that can be used with the Panasonic AW-UE80 4K PTZ or AW-UE100 camera to create live video productions with a green screen.
Vset3D Studio is designed to be easy to use and offers great flexibility for live content creation, thanks to features such as video and image overlay, subject tracking and chroma key.
To use the Panasonic AW-UE80 4K PTZ camera with Vset3D Studio, you will need to connect it to your computer and configure Vset3D Studio to use the camera as a video input source.
You will also need to configure Vset3D Studio’s chroma key and keying settings to achieve professional looking green screen and quality keying.
In summary, Vset3D Studio is virtual set software that can be used with the Panasonic AW-UE80 4K PTZ camera to create live video productions with a green screen. To use these two pieces of equipment together, you will need to connect the camera to your computer and configure Vset3D Studio to use the camera as the video input source. You will also need to configure Vset3D Studio’s chroma key and keying settings to achieve professional looking green screen and quality keying.
To use Vset3D Studio effectively with the Panasonic AW-UE80 4K PTZ camera, there are several steps you should follow. Here are some additional steps to consider when using these two pieces of equipment together:
Set up your live streaming equipment: Before you start using Vset3D Studio and the Panasonic AW-UE80 4K PTZ camera, you will need to set up your live streaming equipment. This may include configuring your computer, network, and live streaming equipment, such as a live streaming encoder or live streaming server.
Set up the camera settings: Before you start using the Panasonic AW-UE80 4K PTZ camera with Vset3D Studio, you will need to set up the camera settings. This may include setting the image resolution, shutter speed, frame rate, and other settings that can affect the quality of the image.
Adjust your green screen lighting: To achieve a professional-quality green screen, you will need to adjust the lighting of your green screen to be uniform and shadow-free. Use diffused lights and reflectors to evenly distribute light across your green screen.
Calibrate your chroma key: Once you have set up your green screen and lighting, you will need to calibrate your chroma key to achieve high-quality compositing. Use Vset3D Studio’s chroma key settings to adjust the sensitivity and tolerance of your chroma key, and adjust the chrominance and luminance levels to achieve the best possible result.
Calibrate the FreeD camera:
Using a physical plane as a target for 3D tracking camera calibration is a common and effective method.
A physical plane is a flat, two-dimensional object that is easy for the camera’s 3D tracking system to identify and track.
By placing a physical plane in the studio and using it as a reference point, the camera can more accurately track the position and orientation of objects in the studio, which can improve the accuracy of the 3D tracking data.
To use a physical plane as a target for 3D tracking camera calibration, you will need to follow these steps:
Measure the dimensions of the physical plane: Use a tape measure or other measuring tool to determine the width and length of the physical plane. Make sure to measure the distance between any objects on the plane, such as the distance between the camera and the plane.
Place the physical plane in the studio: Position the physical plane in the studio according to the dimensions of your studio and the desired position of the camera. Make sure the physical plane is flat and level and that it is positioned at a distance that is appropriate for your camera’s focal length.
Set up the camera: Position the camera in the studio according to the measurements you took in step 2. Make sure the camera is level and pointed straight ahead.
Create a virtual plane in Vset3D: Use the measurement you took in step 1 to create a virtual plane in Vset3D that is the same size as the physical plane. Position the virtual plane in front of the virtual camera at the same distance as the physical plane is positioned in front of the physical camera.
Calibrate the 3D tracking data: Use the camera’s 3D tracking calibration tools to fine-tune the accuracy of the 3D tracking data. This may involve adjusting the camera’s position, orientation, or other settings to ensure that the 3D tracking data is accurate. Make sure to focus the camera on the physical plane and use the physical plane as a reference point for the calibration process.
By following these steps, you should be able to use a physical plane as a target for 3D tracking camera calibration. This will help to improve the accuracy of the 3D tracking data and ensure that the camera is properly positioned for your specific studio setup.
How to Add Light
Select add library icon
Select one light from the Lights Library
Press Add or double click on it
Double click on the light in the 3D view to open the Inspector window
Adjust light parameters
How to Add Camera
Select Add Virtual Camera icon, the Camera will be created at the same orientation as the editor 3D view.
Double click on the Camera gizmo in the 3D view to open Inspector window
Adjust Camera parameters
Mouse camera controls available from Editor view:
Wheel=Move Backward/Forward
Middle Click=Pan
Alt + Middle Click=Camera orientation
Double Left click=Object selection
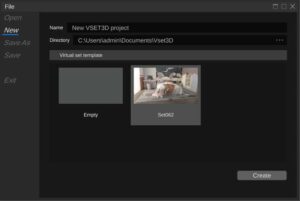
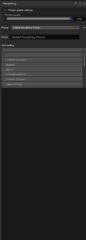
How to Create an Empty Project
Open File menu
Select New
Selectthe Empty templatein the library
Enter project Name
Set Directory if needed
Press Create
How to Import FBX File
Press Add Imported Mesh
Browse your FBX Object
Double click on any object in the 3D view to open Inspector window
How to Setup a basic Ray Traced Project
Ray trace is only available on DirectX 12
Create a new project
Add Camera
Add light
Import a 3D Set or 3D object
Open Rendering Window
Press Add Settings then …
Add Visual Environment (Physically Based Sky)
Add Physically Based Sky
Add Screen Space Global Illumination (Select Ray tracing option)
Add Screen Space Reflection (Select Ray tracing option)
You can now explore all rendering settings to set the desired lighting condition.
Remember to use camera aperture, shutter speed and iso to adjust overall exposure.
How to Import Custom 3D Set In FBX
Create an empty project
Press Add Imported Mesh
Browse your FBX Set
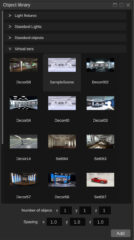
How to Import Vset3D library
Select library icon
Select Virtual Set
Select a thumbnail
Double click on it or press Add
How to Add Live Input or media
Open Sources menu
Press the plus icon (+) at the top right corner
Select the desired source type
Adjust its parameters
How to Add Live Output
Open the Mixer menu
Press the plus icon
Press V Mixer 1
Press > Output
Select the desired Output method
How to Set Project Resolution & Frame rate
Open Setting menu
Press > Video Settings
Set the video standard and Render Frame rate
The Render Frame rate option sets Vset3D vertical synchronization method (MainDisplay by default)
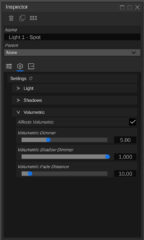
How to activate Volumetric light FX
Set basic Ray traced project
In the Rendering Setting Add Fog setting
Use inspector to adjust Spot light Volumetric settings
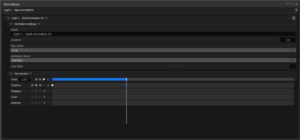
How to Animate object, camera or light
Select an Object or Light from the 3D view
Open Animation windows
Press the plus icon
Press > to deploy the parameters
Press Key Frames to deploy the Key framer
Press Position + to add key at the current time
Change Time
Move the object in the 3D view
Press Position + to add key at the new time
You can do the same for all available parameters. Displayed parameters depend on selected item
How to add item to the Control panel
Select + icon
Select the item
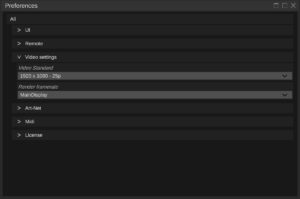
VIDEO STANDARD AND FRAME SYNCHRONISATION
You must set computer refresh rate and resolution according to your project.
To work properly, Vset3D must be running on a perfectly synchronized computer, which means that your Windows display setting must be set according to the resolution and frame rate of your project.
All media, live video and monitors must be played, streamed or set to the same frame rate.
The entire workflow should run at the same frame rate.
Use Windows NVidia Settings to set the frame rate :
Setup your computer for a 25 Fps 1080 Project
Make sure your computer monitor supports 25Hz
Open the Nvidia display settings and set the frequency to 25Hz
If the 25Hz is unavailable, create it with Customize menu
Open Vset3D Studio Settings menu
Select Video Settings
Select 1920 X 1080 – 25P as video Standard
Select MainDisplay as Render FrameRate
Setup your computer for a 30 Fps 1080 Project
Make sure your computer monitor supports 30Hz
Open the Nvidia display settings and set the frequency to 30Hz
If the 30Hz is unavailable create it with the Customize menu
Vset3D primarily uses the GPU for all calculations, so if you are planning large project with lots of polygons, objects, textures, 50 or 60 fps, choose the biggest GPU possible.
Make sure your project does not exceed the memory capacity of the graphic card to avoid shared memory usage.
Using shared memory will cause performance to drop drastically
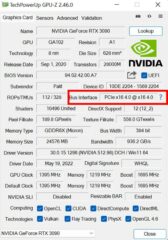
When installing the graphics card in the computer, make sure you have enough free PCIe lanes to ensure that the graphic card bus interface will operate at full speed. Use GPU-Z to check it.
PCIe lanes are the physical link between the PCIe-supported device and the processor/chipset.
CPU Throttling
To avoid CPU throttling
Start regedit
Go to > HKEY_LOCAL_MACHINESYSTEMCurrentControlSetControlPower
Add (PowerThrottling) key
Add DWORD (32-bit), name it (PowerThrottlingOff)
Set its value to 1
Laptop Computers
Vset3D Studio can be operate on high performances laptop.
Don’t forget Vset3D is a video production software and needs to be in sync with all your video inputs and outputs.
So when you choose your laptop, make sure it will be able to operate at video standard frequency.
This two points must be verified:
Make sure its default frame rate is not 120Hz or higher.
Make sure its display can be set to 50 or 25 Hz if you plane PAL projects.
If you are in one of the above cases, you can use an external monitor to set the appropriate frame rate.
Always set the display frame rate and project frame rate to the same value, otherwise you will face dropped frames
Shortcuts
Here is the list of shortcuts available in Vset3D Studio
Ctrl + z
Undo
Ctrl + y
Redo
Ctrl + s
Save
R
Select the rotate tool
M
Select the moving tool
S
Select the scaling tool
Alt + Middle Click
Camera orientation
Tab
Show Hide user interface
Esc
Reset selected window
Alt + Middle Click
Pan/Tilt
Ctrl + Middle Click (in the camera remote view)
Roll
Maj + Wheel (in the camera remote view)
Move forward/backward
A + Wheel (in the camera remote view)
Aperture
F + Wheel
= Focus (Add Depth of Field in the render option to enable it)
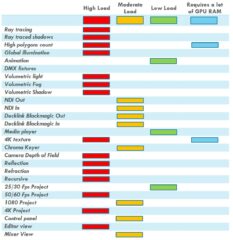
GPU Load Optimisation
Lights count, polygons count, textures count and size, Live outputs or inputs, render FX, Ray tracing, Shadow… All of these have direct impact on GPU load. To maintain stable frame rate and avoid frame dropping, use with care.
The following list shows their estimated GPU load.
Don’t forget to use Render Quality Settings slider to save GPU load (DLSS)
Graphic Cards
Vset3D Studio is designed to use specific features of the NVidia RTX series such as real-time ray tracing and DLSS.
But you can pretty much use any decent gaming graphics card if you don’t need real-time ray tracing. AMD GPUs are suitable for non Raytrace projects.
Vset3D Studio does not take advantage of the multi-GPU setup.
Since Vset3D Studio uses the DirectX API, it is not recommended to run it on a Quadro GPU.


 Companion